Here is your comprehensive guide to taking care of curly hair in a dry climate! I’ve lived in dry climates for most of my life, but now with more and more gray hairs which are extra prone to dryness, I really needed to buckle down and crack the code. In this post, I share the 4 problems curly hair faces in a dry climate, and my 18 best tips for achieving healthy and hydrated hair despite them!
Weather is a big concern with hair… and with curly hair in particular.
Many resources on the web will help you with your hair in humidity… but what if you live in a dry climate? What can you do?
Honestly, I’ve looked and looked, and there are very few resources to help. So I decided to really focus on this myself and crack the code.
Because… in a dry climate, your curly or wavy hair is likely to struggle a lot more with dryness, frizz, lack of curl definition, loss of shine, and damage.
I have lived in dry climates most of my life (Idaho, Montana, and California), and I have recently paid quite a bit of attention to the unique problems it gives me… trying to solve them once and for all.
I’m not trying to be fatalistic here, but I feel that living in a dry climate, along with me having fine hair strands and high porosity hair, is somewhat of a recipe for disaster. 😉 And on top of that, my curls are a blend of 2c to 3c with the most wimpy curls on top, so they really don’t want to stay curly and will stretch and fall out easily.
Now don’t get me wrong, I’m not eager to live elsewhere. There are benefits to living in a dry climate — such as lack of humidity, no mold issues, and fewer bugs!
But being real, a dry climate means struggles with your curly hair that sometimes seem insurmountable! But take heart, they’re not.
Defining Terms
Before I explain the problems and give the solutions, let me define some terms.
First… dry hair. There are two ways I use the words dry or dryness in this article. It can refer to the amount of water in your hair and/or the air. Meaning, your hair is wet out of the shower versus diffused or air-dried to where it’s not wet anymore. Or, the air has less water in it (the opposite of humid).
The second common usage of dry is often said by those who find their hair to be brittle or not soft, so it’s more than just the amount of water in the hair, it’s about the texture and/or damage to the hair.
Most of the time I use the word “dry” in this article, I will be using the first meaning (how wet/not wet your hair or the air is). Also keep in mind that even when we say our hair is dry (meaning not wet) it is not completely devoid of water. Ideally, your hair still contains a healthy amount of water to keep it soft and what we call “hydrated”. This will come up again.
Dew Point
Next, what exactly is a dry CLIMATE? We all probably know that there are various levels of water in the air. In humid climates, there is a A LOT of water in the air, and in dry climates, there is less. The most accurate measurement of this is the dew point:
The dew point is the temperature to which air must be cooled to become saturated with water vapor, given a particular air pressure and water content. When air is cooled below the dew point, its moisture capacity is reduced and airborne water vapor will condense to form liquid water known as dew. When this occurs through the air’s contact with a colder surface, dew will form on that surface. The dew point is affected by the air’s humidity. The more moisture the air contains, the higher its dew point. (Source.)
Now you don’t have to understand that too much. Just know, if you look up the dew point in your weather app, use these values to identify if your current day’s air is dry, moderate/comfortable, or humid:
- Dry: dew point below 50°F (10°C)
- Comfortable/moderate: dew point between 50-59°F (10-15°C)
- Humid: dew point above 60°F (15°C)
(Source.)
Sources vary on what dew point values actually constitute dry, comfortable, or humid weather. So just use the list above as a starting point and see what your hair does in various conditions.
I am writing this on June 23, 2023 in Boise, Idaho and the current dew point is 43° F:
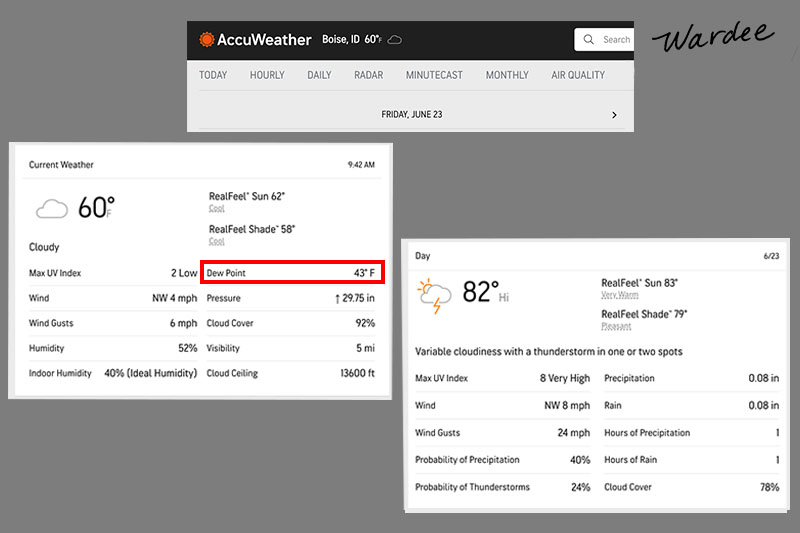
In other words, it’s a DRY climate and boy, does my hair know it. 😉
You can live in a dry climate in both the cold winter or the hot summer… or both. For instance, here in southern Idaho, it is dry most of the year, with some days being moderate and others being humid. When we lived in Oregon, it was humid for most of the year (winter and spring… rainy season) yet dry in the hot summer.
The Role of Moisturizers
We often talk about moisturizing hair, but did you know there are two categories of ingredients that “moisturize” your hair, keeping it supple and soft as opposed to dry and brittle?
Humectants
Hydration has to do with how full/empty your hair is with water. Ingredients that help your hair hang on to or even draw water are called humectants. The most common humectant in hair (and skin) products is glycerin. It’s very, very good at holding on to water. There are many others, though, such as hylauronic acid, flax seed, aloe, and more. Again, even dry hair (not wet) should have some water in it, otherwise it doesn’t look or feel healthy.
Emollients
And there are fat-based ingredients that “moisturize” or “condition” hair. These are called emollients and you’ll find them as oils and/or butters in your hair care products, such as conditioners and curl creams. (These products also often contain humectants.) Oils tend to be lighter emollients, while butters tend to be richer and heavier emollients.
Putting It All Together
Normally, oil/fat and water don’t mix. However, our hair needs both in a proper balance for our hair type and issues. Most people use a blend of both in their shampoos, conditioners, and styling products. Additionally, as we’ll discuss below, emollients are typically used to “seal” the hair once styling is done to stave off any transfer of water between hair and air.
Because… in humid environments, water tends to ENTER the hair, causing it to swell and frizz. In dry environments, water tends to LEAVE the hair, leaving it more dry and frizzy. Yet in moderate climates, there is less of an exchange of water between hair and air, which is why our hair tends to behave better when it’s not super dry or super humid.
Thus, in humid or dry climates, using humectants in our products as well as sealing our hair with a finishing emollient can help delay how quickly and fully this exchange of water between hair and air happens.
First, the Struggles of Curly Hair in a Dry Climate
Ok, so are we clear on terms? You might even already be sensing where I’m going with all this. But even so, let me describe the problems that arise from a dry climate more in depth.
Because, if you live in a dry climate and you’ve been struggling with why your curly hair always looks worse than everyone else… or why the products everyone else uses don’t work for you… or why your hair can look good first thing in the day but it doesn’t last more than a minute… you might be experiencing one or more of these dry climate problems yourself.
Don’t worry — I have fixes coming for you, too. But first, the bad news… 😉
Problem #1: Dryness and Frizz
Because water wants to balance, when the air is more dry than your hair (meaning how much water each contains), water will leave your hair and go into the air, leaving your hair even less hydrated than it should be. The cuticles flare out, searching the air desperately for needed water hydration, and that’s how you get a frizz halo.
Believe it or not, when you feel your hair is dry (meaning not wet) there is still water in it. You don’t want that water to leave, too… yet it often does in a dry climate, leaving your hair dryer than it should be as well as frizzy.
Problem #2: Lack of Curl Definition
When your hair gets frizzy and loses that essential base hydration described in problem #1, the curls lose definition and your hair overall just looks puffy, and maybe even rough and dried out. In addition, and as a side note, if your hair needs more protein than it’s getting, it will not only lack definition, but it won’t appear as curly as it really could be (not living up to its potential).
Problem #3: Lack of Shine
When hair is moisturized (through water, humectants, and emollients) it looks shiny and healthy. If it “dries out” and lacks in any of those, it’s no longer shiny and doesn’t look as healthy.
Problem #4: Damage
Sustained lack of moisture (lacking water, humectants, and/or emollients) leads to extra dry, damaged hair, where the cuticle is more and more open instead of smooth, and the hair shaft itself, down to the core, gets brittle and damaged. This hair becomes less and less healthy over time.
If you already have high porosity hair, it just makes the problems even worse, with more cuticle damage or cuticles opening even further or the hair shaft itself experiencing breakage. This damage takes time to repair with special products and in many cases cannot be fully reversed; only cutting it off will give you a clean slate.
And here’s a bit more bad news… (sorry)
- You cannot completely get rid of frizz. It’s natural and we all have to live with it. We’re just trying not to be frizz balls!
- In order to protect your curly hair from getting fuzzy or frizzy in dry climate, you will gain some curl definition… but might lose some volume.
- Your hair won’t be the same every day. We can’t dial it in that tight!
These aren’t deal breakers for me. I think I’ve found a sweet spot where I’m ok with the amount of frizz that’s left. The curl definition, I love! Some days, I get it totally right and still have volume, where other days I might sacrifice a bit more.
How to Care for Curly Hair in a Dry Climate
Now that we’ve heard the bad news… let me give you the good news. Here are 18 tips to help you take better care of your curly hair in a dry climate so the problems I described above will not plague you (so much).
Tip #1: The Right Products for Your Hair
I mentioned already that we all need a good balance of hydrating water, humectants (water drawing/holding), and emollients (oils and butters to seal in hydration) in our hair care products.
I’ve addressed how to determine your hair type so you can choose the right products in this post so I won’t go into it too much here, other than to mention it’s the baseline for all the other tips that come next.
For me, since my hair is both fine (strand thickness) as well as high porosity… I need to use lightweight products with lighter oils as emollients as well as protein to give my hair more strength and structure to form stronger and curlier curls.
In addition, I do need to deep condition due to the effects of the dry climate on my hair. I will discuss that more later. This tip simply has to do with getting your base shampoo, conditioner, and stylers appropriate to your hair type and needs. Because you need a good base!
Contact me any time for recommendations that might work for your hair and issues. I’d love to help.
Tip #2: The Right Stylers
I want to talk about stylers (styling products) specifically, because they are KEY.
I know, I know… many of us wish we could only use one styler and be good. And some even eschew stylers altogether and say they don’t want or need one at all.
I don’t believe you can reach your curly hair potential without at least ONE styler. Stylers provide some, if not all, of these benefits:
- moisture — through water, humectants, and emollients
- curl activating ingredients — so your waves are wavier and your curls are curlier
- hold — to help you define and hold your waves and curls longer
- structure and strength — in the form of protein or other bond-strengtheners to help your curls and waves be stronger and last longer
If you want your hair to look and feel better, you need to use stylers!
For me, living in a dry climate and also aging with drier and coarser grey hairs, I can’t get away with just one styler anymore. I am currently using a leave-in conditioner, a curl activator/curl cream, one or two strong hold gels, and a finisher. My products are lightweight, water-based, and often contain protein. They don’t weigh down my fine hair yet they give me the hydration, moisture, activation, definition, hold, and strength my hair needs.
A Word on Gel
As gel is usually the last styling product applied before hair is dried (other than sometimes people use a mousse or foam afterward), it’s one of your last chances to seal all that hydration in. So, ideally you should choose a strong hold gel that also contains sealing ingredients such as polyquats (polyquaternium-xx where xx is the number of its variation) or vp/va copolymers. Layered on top of the other stylers, theoretically it will prevent loss of hydration even once your hair is fully dry (i.e., not wet) because it seals in everything underneath it.
If you’re not getting the results you want and are clinging to a desire to use one or no stylers, I would encourage you to start branching out. It’s hard to find a one-and-done product for anyone’s unique hair needs. Not that it’s not possible. However, so far in my journey, I haven’t found it to be so.
The technique of application is important, too… so keep reading below for more detail on that.
Tip #3: No Strand Left Behind
When the weather is dry, one of the most important things you can do is ensure every single strand of hair is protected by your styling products and for all the benefits listed above (hydration, moisture, activation, definition, hold, and strength).
No matter your technique — whether it’s with a brush, raking in the product, or sectioning your hair — take your time and ensure products are evenly distributed throughout your hair.
You might have areas that tend not to turn out as well. I sure do. For me, it’s on the top layer of hair, and specifically at the back/crown and left side. My hair is not only not as curly in those places (tends toward wavy), the hair needs more moisture and hydration as well as activation and structure for curls.
So, first I apply my styling product throughout and then I go back and apply a little more of that particular product on the problem areas to make sure they get a bit more attention.
I’ve noticed better curl formation, definition, and hold in the areas that used to suffer by doing these two things: thoroughly applying products throughout and then applying extra to areas that need more.
Tip #4: Order Matters
Although we’ve discussed this before, I feel it’s important to mention that applying your styling products in order matters. Typically (though there are exceptions), here is the order:
- leave-in conditioner*
- heat protectant (if using)
- curl cream and/or curl activator
- serum
- gel
- mousse/foam
- finishers — when hair is dry (not wet)
*Usually if you’re using a curl cream, you don’t need a leave-in conditioner. However, in our dry climate, I find my hair does better if I use both.
You can “cocktail” your products together, but personally I get better results when layering in the order above. (I hardly ever use a heat protectant, serum, or mousse/foam.) Imagine the products filling in the gaps of your hair strand, between the cuticles, as well as on top of the hair strands, and layering them up as you go.
Remember not to overdo each individual product — especially if you have fine strands or low density hair and are applying more than a few products. I have fine hair as well as low/medium density, and I am typically using a pea- to dime-size amount of each product. I also mostly choose products that are known to be water-based and lightweight, making it hard to overdo them.
Go here to learn the difference between gel and curl cream and how to know what your hair needs.
Tip #5: Technique Matters
Heard of these? Squish to condish, brush styling, rake-n-shake, scrunch, rake in, praying hands, glaze… these are all styling techniques you can use to apply products (mostly stylers) and/or define your curls.
As you experiment, you will find some work better for you than others.
For instance, when I’m applying my leave-in conditioner and curl activator, I first rake them through my hair and then I use a brush to make sure they are not only distributed throughout but also the cuticles are smoothed down.
When I apply gel, I sometimes brush it through, but most of the time I rake in and then smooth over with praying hands (again to smooth down cuticles) before scrunching to help the curl clumps form. I also glaze more gel over all the clumps after microplopping to ensure all strands are still coated (more on that below).
Throughout all applications of products (including conditioner, deep conditioner, and bonding treatments), I also squish to condish. This is where I smooth the products through and then I encourage them deeper into the hair by a scrunching motion. Squish to condish refers specifically to conditioner but you can use the same technique with styling products, too.
Personally, I think these are the techniques that work best with high porosity, curly hair in a dry climate. They encourage products deep into the hair as well as smoothing down cuticles to help with better definition and less frizz. You should experiment to see what works best for you.
When you experiment, make sure to test just one new thing at a time (including switching or testing new products), so you know what worked and what didn’t!
And I do all of this when my hair is soaking wet, which I will discuss in the next 2 tips.
Tip #6: Apply Stylers in a Humid Environment
Remember what we’re trying to fight? Water transfer from hair to air.
One of the best ways to prevent that transfer is to style your hair in a humid environment… the bathroom or shower.
Our bathroom is quite big and our climate is dry, so even if I don’t turn on the fan when taking a shower, the bathroom doesn’t get that humid. So for me, I prefer to apply all my stylers while I’m still in the shower and the hot/warm water is running. It’s nice and humid in there. That means my hair stays hydrated as I layer, smooth, and scrunch everything in.
Others with smaller bathrooms that do get humid from showering might do fine to apply styling products once they get out because the room is humid, too.
So be sure to apply your stylers in humidity (you can even leave your fan off until you’re all done). And also keep in mind that the other part to this humidity piece is to…
Tip #7: Apply Stylers on Wet Hair
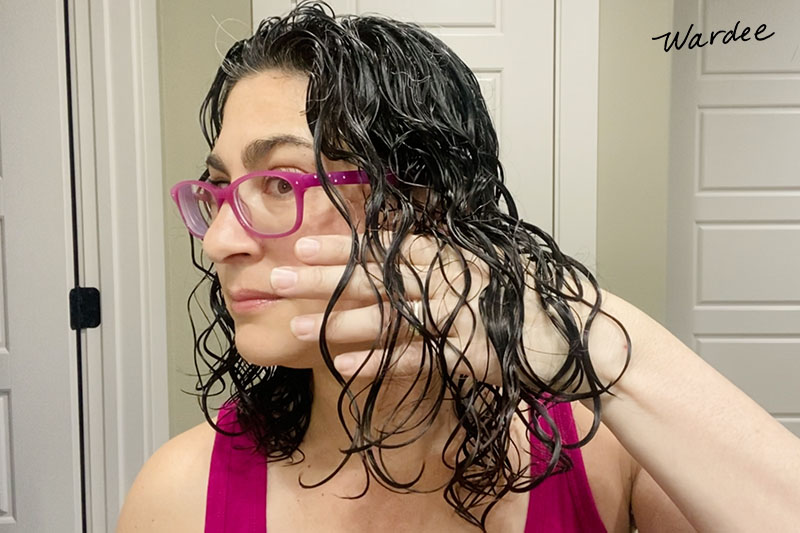
I prefer to apply styling products to sopping wet hair… because WATER is a key part of hydrating hair.
I know that people apply styling products to damp hair and if it works for them, great. For me, it it does not. I need sopping wet hair and preferably still IN the shower where it’s humid to get the best results.
There are three ways I know if I have enough water in my hair when applying products. First, my hair feels slippery and wet, rather than already drying. Second, as I’m scrunching to create curl clumps, the clumps are ropes or ribbons of hair together rather than stringy hairs all separate and/or frizzy (called wet frizz). And finally, when I scrunch, I hear a squishy, watery sound — which tells me there is definitely enough water in my hair.
If you’re doing this and you feel your hair is dry or brittle or your curls are stringy, first try adding more water to see if it fixes things. If it doesn’t, you can try adding more of whatever product you think your hair needs (leave-in, curl cream, or gel) to see if it fixes the bad feeling or stringiness. Then if you still can’t fix it, you might rinse out the products and try again with a different combination of products or more of whatever will give you the good feeling. Sometimes stylers react with each other and just don’t work well together, or they don’t work on your hair… which you will know because they don’t feel right.
Tip #8: Apply More Product After Microplopping
Plopping, dry plopping, wet plopping, microplopping… lots of different kinds of plopping.
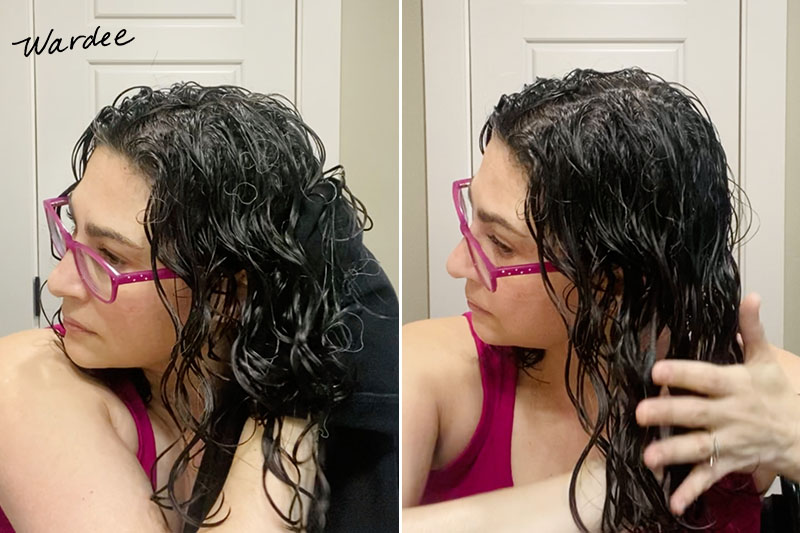
Microplopping is specifically the kind where you take a t-shirt or t-shirt towel (not regular towel) and scrunch dry your hair after applying styling products and creating your curl clumps. The purpose is to remove excess water to shorten drying time. (Side note: use a damp portion of the towel or t-shirt and be gentle… scrunch, don’t rub.)
Microplopping really does work to speed up your drying time. However, the downside is… along with excess water, it will also remove excess product. And sometimes, it can take too much product off.
But as it’s an essential step, here’s what I do to overcome the downside. After microplopping, I grab the gel that I applied last. It’s the one that has the best hold and sealing properties. I spread a tiny bit of it between my palms and I gently smooth (aka glaze) over all my curls, underneath and on top, but especially concentrating on the top where my frizz halo appears (and where my hair needs more help to stay defined and curly). Then I scrunch the clumps a tiny bit more, but not much because there’s not much water left in my hair at this point (and scrunching is best done with lots of water present).
So there you go… now you’re ready to diffuse (or air-dry) and you’re not missing product in key areas.
Tip #9: Diffusing for Dry Climate
Although it’s more convenient to air dry, you will arguably get better results if you diffuse, and for two reasons. First, water weighs your hair down so the sooner you get it out of your hair (the amount that’s making your hair “wet”) the more curly your curls will be; diffusing helps your curls to shrink up more. Additionally, if you air dry, you’ll get more frizz simply because it takes longer and you’re not “setting” your products to seal up your hair and prevent frizz.
I think there are better ways to diffuse than others. I shared my updated diffusing routine here (upright to be easier on the neck).
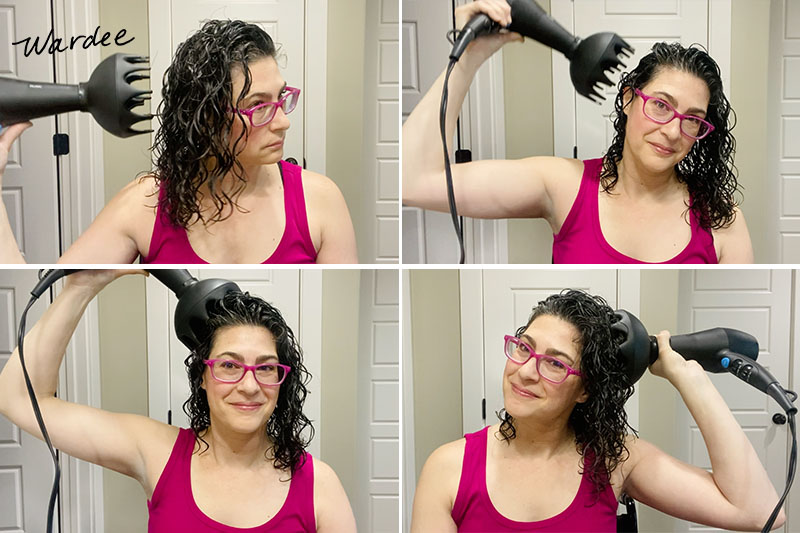
The key parts of my routine that work very well in a dry climate are:
- hover diffusing at the beginning to “set” the cast of the products
- hover diffusing at the roots to dry them a bit first, because they’re always going to take longer to dry than the ends
When hover diffusing, be sure to turn your head in various directions so your hair doesn’t lay flat. You want to be encouraging root volume the whole time. Even if I tip my head upside down, I do it with a neutral neck so I don’t hurt myself.
Also, this is something I’ve learned since recording the video… hover diffuse while pointing the diffuser *down* the hair shaft to help smooth the follicles instead of fluff them up. (Learned from @biscuits_and_gravy_wavy right here on Instagram.)
I diffuse only until my hair is about 80% dry. Because if I dry 100%, my hair ends up more frizzy when all is said and done. This isn’t the same for everyone, so do what works for you.
Please watch my diffusing video to see the whole routine, because it’s all pretty important for keeping frizz to a minimum and getting good results. If you do it right, you’ll find that you get a better gel cast, which is essential for sealing in that hydration. You’ll also find you get better curl definition and hold as well as less frizz.
One other thing you might try, which I am only beginning to test myself, is the “smasters” technique, where you apply more styling products (gel and/or curl cream) mid-way through diffusing. You would do this if you are beginning to see frizz or areas that are soft and not casted or less defined. I’ve tried it a few times, and I think there’s something to it. (“Smasters” is the username of the gal who shared the technique originally on a curly girl forum.)
Go here to see what diffusers I recommend.
Tip #10: Leave the Cast In
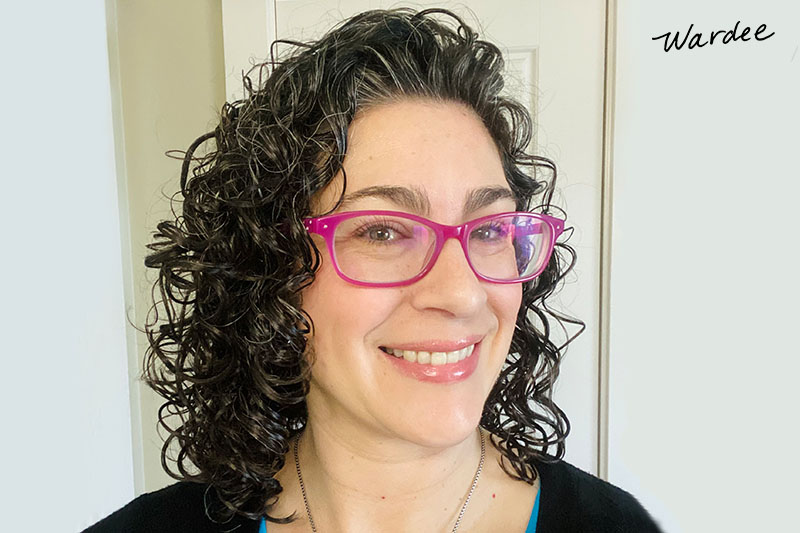
Leave the cast in as long as possible!
I do have to say that I don’t get much of a cast. Perhaps it has to do with my hair being fine so I use lighterweight and less products, or maybe it’s because my hair tends to be soft, but mostly I think it’s because I apply styling products to sopping weight hair. The water dilutes them so they don’t set as hard.
Still, I get a bit of a cast some days. And since my gels tend to have sealing ingredients (to hold the hydration in), my results last longer if I wait as long as I can to soften the cast. Some days, I don’t soften the cast at all (but I do smooth a finisher over… see next tip) and some days, I soften the cast after a few hours.
Again, I don’t get much of a cast, but the longer I can avoid disturbing whatever cast I do get… the longer my curls last. By last, I’m talking about duration (multiple days) as well as looks… shine, clumping, and less frizz.
Here’s how to soften the gel cast or “scrunch out the crunch”.
Tip #11: Seal It!
This one is tricky for me, because of all the tips I’m sharing here, it’s the one I feel I haven’t gotten quite right. Before I get into that, though, let me share what’s going on here.
You shampoo, condition, and use styling products… all of which have the right balance of hydration, humectants, emollients, and even protein. Then you leave your humid bathroom and go into your dry house or outside, and within minutes, that water that’s in your hair is now beginning to transfer to the air (remember, it wants to balance). THIS is why your hair looks good at first, but gets frizzy in short order.
What can you do about? Finishing products, or sealants, are the answer.
You use emollients to SEAL in the water content of your hair.
This is what hair oils do. And there are also lighter-weight, non-oil based sealers, too. (And remember, if you choose a strong hold gel with sealant properties, you will get some help with this earlier in your routine, too.)
How to apply an oil or sealant:
When hair is dry (not wet) put a few drops of hair oil (or other finisher) in your palm. Rub between your palms. Smooth over your hair, or use another method such as clapping or scrunching (as in “scrunch out the crunch” like this) to coat your curls gently with the sealant.
Back to me… I diffuse my hair until 80% dry. Then I wait until my hair is 100% dry, at which point I use a lightweight cream sealant (with some hold properties) to smooth my hair. It’s remarkable how it smooths down any frizz that’s started and adds hold to the curls. But, during that time of waiting, I’m not in the humid bathroom anymore, so I have gotten some more frizz and I have lost water from my hair into the air. Not a ton, though, because my gel has sealant properties. Sometimes, you can’t completely solve the problem, you just have to do the best you can. I’m still tweaking this part of my routine.
Tip #12: Smooth Throughout the Day
Whatever your favorite finishing product is, use it throughout the day to smooth down frizz, reform curls that might be falling out of their clumps, and bump up the seal protection.
The two ways I do this are: smooth down the crown (frizz halo) and smooth individual curl clumps.
If your finishing product is an oil and you have fine strands or low density hair, you might want to choose a lighter-weight sealing or finishing product instead. Your hair probably can’t take too much oil without being weighed down. Mine can’t!
Tip #13: Protect Your Hair
When sleeping or working out, protect your hair with a silk pillowcase and/or silk bonnet. I shared more about protecting curls while sleeping here.
If you don’t, you’re just letting your hair rub on the pillow (even if it’s silk), creating frizz, losing curl definition, and losing sealant protection.
If I do a good job on wash day (with all the tips mentioned here) and I sleep with a bonnet, I will wake up on subsequent days with mostly shiny, bouncy, defined curls. I will do a quick dry refresh, but other than that, I’m good to go.
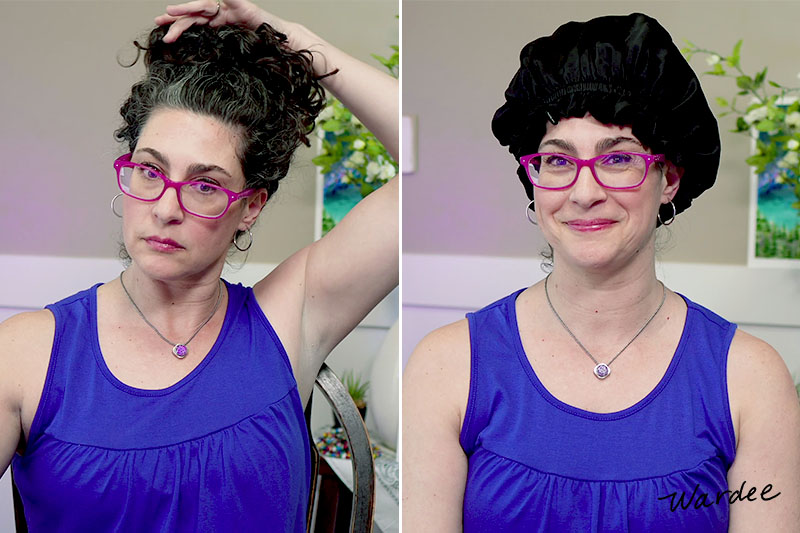
Here’s how I do it…
- I put my hair in a ponytail on top of my head with a silk scrunchie — wrapped only twice so it’s loose.
- I add a few tiny claw clips to help the longer curls stay tucked up there in the pineapple.
- Plus an alligator clip at the bank to hold the shorter back pieces up, very loosely and gently.
- Then a silk bonnet on top of all that.
I’ve shared before that I couldn’t use a silk scrunchie with my bonnet (to hold curls in a pineapple on top of my head) because my curls get too stretched out. However, as I’ve refined my dry climate routine, I’m finding that I can now use a scrunchie! My hair will still come down curly, shiny, and defined in the morning. This is great, because it’s really best to have your curls on top so you’re not smooshing them when you lay down your head.
Let’s talk about refreshing next…
Tip #14: The Best Refresh
Ok, so I’m not really sure what the best method of refreshing is for you. But certainly you can experiment, and I hope I can help a bit with it.
I have experimented a lot with refreshing methods. There are dry, damp, or wet refreshes. Refreshes involving certain types of products (gel, mousse/foam, curl cream, finishers). And combinations of both.
For me, with my curly hair type and living in a dry climate, any refreshes involving small amounts of water (basically anything other than a full wet refresh) just make my dryness and frizz worse. Any water or steam I put on my hair goes right back into the air, leaving me with even more frizz. So that’s a no go.
Dry refreshes or full wet refreshes work best for me. The extremes. 🙂
In a dry refresh, I’m using small amounts of a styling product (usually a curl cream) to hydrate and smooth my hair. I smooth it over the top/crown as well as underneath, and I also apply it to individual curl clumps to smooth and redefine them. I might dilute it a tiny bit with water if I feel my hair is getting too product-y. Note: I usually shower on these mornings, too, so I wear a shower cap to prevent water or steam from getting into my hair. (Like this one.) This is before refreshing.
In a full wet refresh, I’m wetting my hair down fully in the shower. I co-wash with a conditioner to restore hydration and re-moisturize. Since some amount of the styling products I used previously have rinsed off, I re-apply all my styling products, too, but less of them since my hair still has some on there from wash day. Then I microplop and diffuse just as if it was wash day.
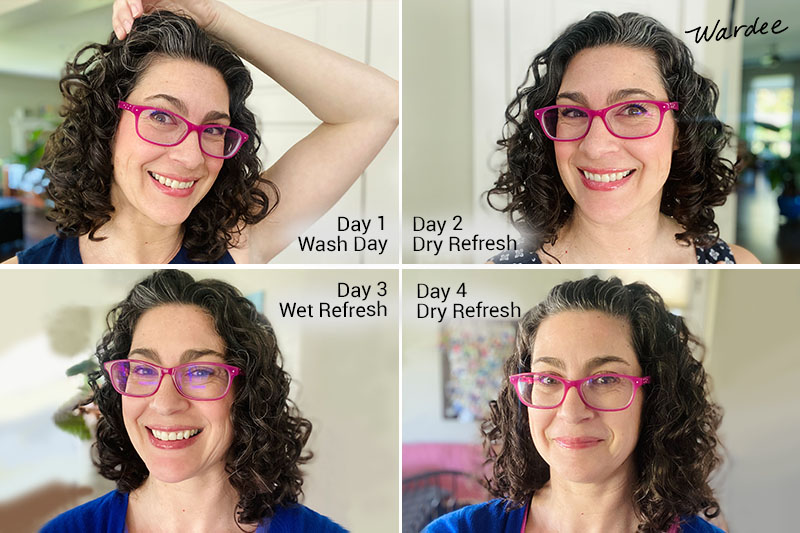
My current refresh routine is currently:
- Day 1 — wash day (no refresh)
- Day 2 — dry refresh (hardly anything to do if my wash day was a good one)
- Day 3 — full wet refresh
- Day 4 — dry refresh (if the previous wash day and full wet refresh were good ones… otherwise it’s a wash day)
- Day 5 — wash day (no refresh)
If I don’t wash my hair on day 5 (and sometimes as early as day 3 or 4 if the previous wash day wasn’t good), it tends to look bad no matter what type of refresh I use. So I’m back to a full wash day. When I say my hair looks bad no matter what, it’s because my “problems” at this point are:
- my hair has fine strands so I have too much product on my hair (build-up)… adding more just contributes to it looking greasy and stringy
- because of the dry climate, my curly hair is just really dry from water transfer to the air and needs to be completely redone and resealed to start with a clean slate
You should experiment with different products and different ways to refresh, but also keep in mind that the needs of your hair change day to day. Your hair might need a full wet refresh one day and nothing the next. One day you might need to refresh with gel and another day with curl cream. And you might need to just scrap everything and do a full wash day. Don’t expect the same thing every time… be willing to adapt to your hair’s needs.
A Note on Hygral Fatigue
I want to mention something about full wet refreshes. A lot of people suggest to avoid them, or at least to avoid doing them frequently, because they say that the constant swelling and shrinking of hair due to water absorption can lead to hygral fatigue (weakening of the hydrogen bonds in the hair) and eventually damage from which you can’t recover.
In my research, I feel that this concept of hygral fatigue isn’t well studied enough for us to know for sure that damage is occurring, plus I think you have to take more into account than simply how often you wet your hair down. For instance, in my situation, with a dry climate and fine hair strands… a full wet refresh is sometimes the only option. How else am I going to restore water content (hydration) to my hair? And with my hair having fine (very thin) strands, they don’t hold as much water or for as long as someone with regular or coarse strand width.
Finally, my hair is NOT damaged; it’s very healthy and I’ve been full wet refreshing for YEARS. So take the curly hair “rules” with a grain of salt and find out what works for you.
#Tip 15: Special Treatments
Does your hair need special treatment? I believe that most of us benefit from incorporating extra special treatments in our routines, whether weekly or monthly or every few months. Such as:
Clarify
If you have product build-up or hard water deposits/minerals “clogging” your hair, then you can’t really hydrate or moisturize properly, leaving your hair more frizzy and uncontrollable and with wash days that don’t last very long. Be sure to use a clarifying or chelating shampoo regularly to keep on top of this. Clarifying shampoo removes product build-up and chelating shampoos also remove hard water deposits. If you’re using a gel with polyquats or vp/va copolymer as I mentioned above, you definitely need to clarify!
Deep Condition
If your hair is high porosity, you have thick/coarse hair strands, or you live in a dry climate, you likely need deeper conditioning from time to time. This restores some of the moisturizing you need as well as prevents your hair getting too dry. Personally, I deep condition once a week, if not more. I use a deep conditioner that can be used in place of regular conditioner and I leave it on for 5 to 10 minutes after shampooing. I do this while in the shower and I try to do it on days I need to shave so I have something to do in the shower while waiting.
Protein
If you have fine hair strands or high porosity hair, your hair likely benefits from more protein. You can supply this regularly with shampoo, conditioner, and styling products that contain protein and/or through dedicated protein treatments such as this homemade one. More about protein here, including a DIY protein treatment.
Bonding Treatments
Where protein tends to fill in gaps on top of the hair and between cuticles, bonding treatments go deeper. They can help repair and support the hair’s structure all the way to the core. Keep in mind, they can’t reverse damage, but they can help quite a bit to smooth and strengthen hair and make it look and feel less damaged. They can also help prevent more damage.
The bonding treatments I use are pretty quick acting, as in I leave them on for 10 minutes in the shower after shampooing. My favorite one says you can use it in place of conditioner, but I don’t find that to be true for me, perhaps because of our dry climate. I follow it up with a conditioner every time and get better results.
Hair Cut
I had to include this because with some damage, no amount of clarifying, deep conditioning, protein, or bonding treatment is going to help. The damage is too far gone.
You can wait to grow out your hair and trim it off as time goes by. Which, depending on your hair length, can take 1 to 2 or more years. Or, you can cut it all off and grow your hair out, taking better care of it with all these tips, so it doesn’t get so damaged in the future.
Tip #16: Shampoo Less and Co-Wash More
Co-wash is to “wash” with conditioner only. You massage your scalp with conditioner and finger detangle using conditioner to assist. Leave it on for 5 to 10 minutes, then rinse out and proceed with styling.
Even though I have fine hair strands and co-washing is usually a no-no with hair like mine, it actually works well for me. I think it’s because we live in a dry climate and I need to avoid over shampooing while restoring hydration to my hair (plus emollients).
Yet I definitely shampoo my hair, don’t get me wrong. I shampoo every other time I fully wet my hair down. And the other times, I co-wash.
Here’s what one week might look for me (currently):
- Day 1 — Monday — wash day with clarifying or chelating shampoo and deep conditioner (and maybe bonding or protein treatment)
- Day 2 — Tuesday — dry refresh
- Day 3 — Wednesday — full wet refresh with co-wash
- Day 4 — Thursday — dry refresh
- Day 5 — Friday — wash day with non-clarifying shampoo and conditioner (or deep conditioner if needed)
- Day 6 — Saturday — dry refresh
- Day 7 — Sunday — full wet refresh with co-wash
Tip #17: Smooth Clothing and Accessories
Wherever your hair rubs… shirt, sweater, hat, scarf… you’re transferring hydration from your hair to the clothing, resulting in drier hair, loss of definition, stretched out curls, and frizz.
To minimize this, wear smooth or silky tops and/or accessories. I normally always wear smooth 100% cotton tanks or t-shirts, or else a cotton blend that’s very smooth. If I wear a scarf, it’s also smooth or silky (but actually I don’t wear scarves very often). Even adjust your hat-wearing accordingly… either purchase silk- or satin-lined hats or else wear a silk or satin scarf underneath the hat.
Tip #18: Internal Health
Your health on the inside matters! Address hormone imbalances (here’s how to balance hormones naturally), eat a clean diet, use non-toxic personal care and household products, and be sure to drink enough water. Dehydration is a big factor in hair and skin dryness.
What Next?
Whew! These tips for taking care of curly hair in a dry climate got longer than I planned, but I couldn’t leave anything out. Because truly, ALL these tips have helped my hair throughout the years. Especially these days as I’m getting older and having more trouble! It’s like the dry climate and my age is catching up with me, so I had to figure out new tricks to keep on top of things.
Thanks for reading this far. I would love to hear from you if you try any of these tips and what your results are.
Are you interested in trying out or getting more info on the non-toxic products I use and recommend? Go here.
God bless you! Bye bye!
Leave a Reply