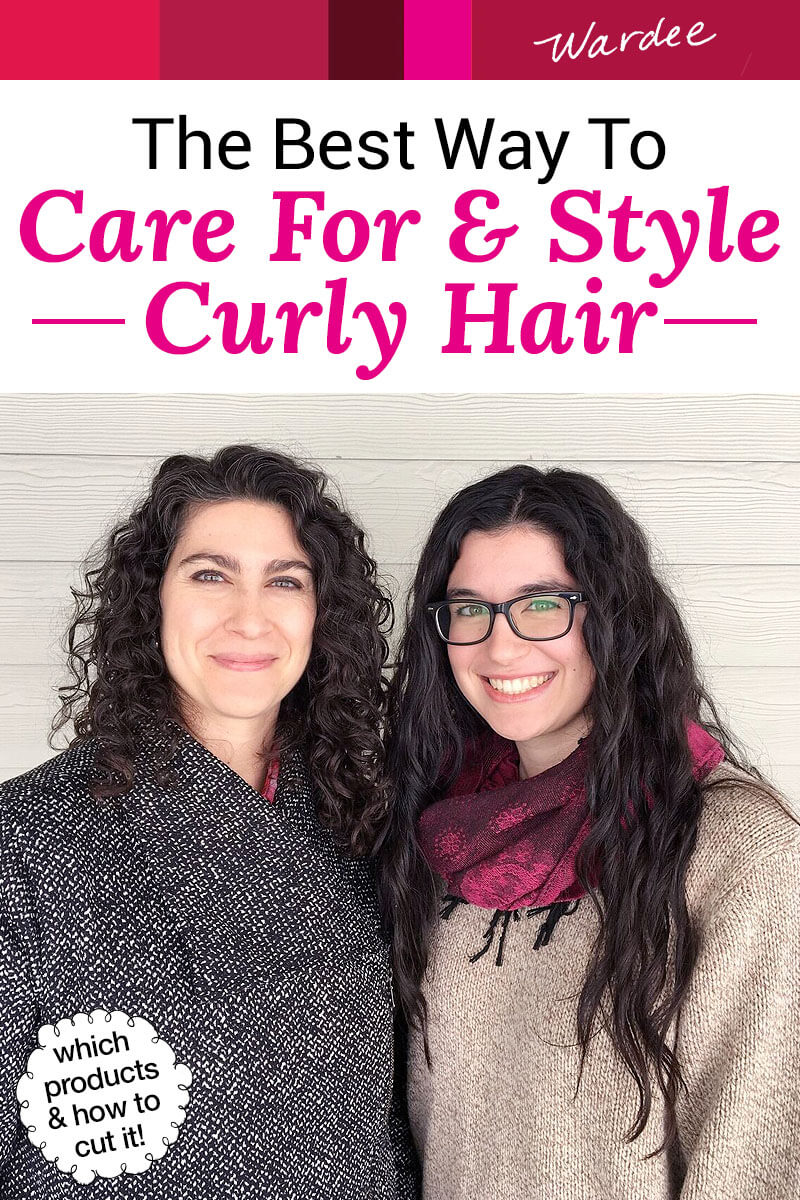
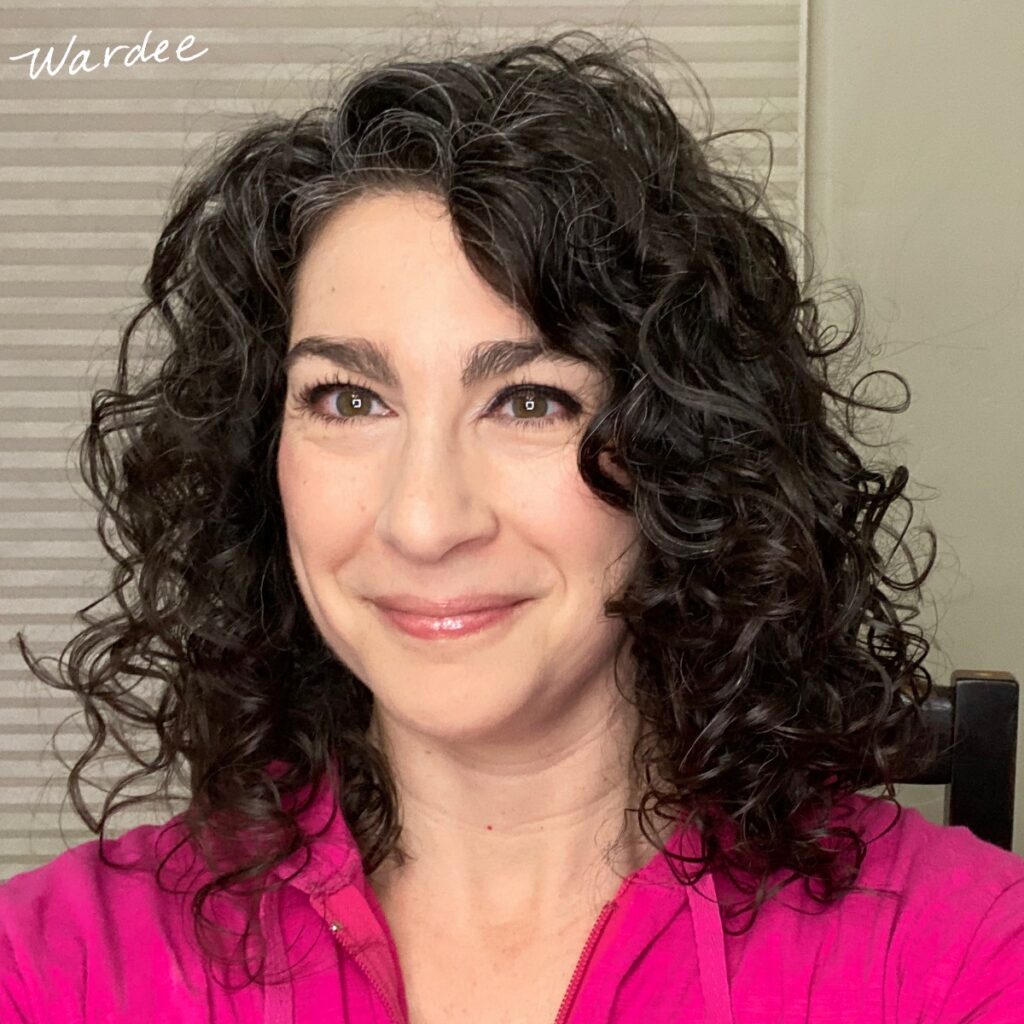
Short or long, wavy or curly, it’s time to embrace your natural hair! Here’s the best way to care for curly hair, including styling and hair porosity tips, plus my daily hair care routine for glossy, full, and well-defined curls.
Tangles, frizz, dryness… Desperation!
It’s amazing how bad hair can put us practically in tears, isn’t it?
I’ve been there, just hating my hair and the misery of dealing with washing, tangles, tearing, static, frizz… Yuck!
I even told my husband awhile back that I now know why women cut their hair off when they get older.
Thankfully, my hair has recovered and I’m not chopping it off!
Because…
…it only took one night, one shower, one particular method of cleansing/conditioning my hair for its condition to change OVERNIGHT. For the better!
And since that one night, I’ve learned and incorporated more tips and tricks just for curly hair… and my hair continues to get healthier, shinier, curlier, and less frizzy.
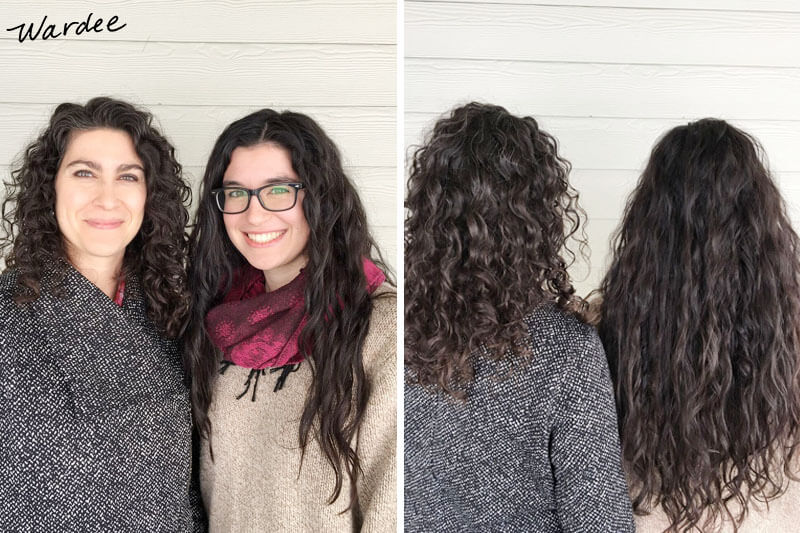
My life (and my hair) is forever changed… for the better! My daughter Haniya, with wavy hair, can say the same thing.
In this post, I am sharing my definitive guide on how to care for curly hair naturally… including how to choose non-toxic products for your type and how to get it cut!
All this has made a huge difference for me — and I know it will for you, too!
Plus here’s a quick 2-min video that shows you how I style my hair on non-wash days… it looks just as good! (This is essentially what I do on wash days, too!)
The Question: How To Take Care Of Curly Hair Naturally!
Mary B. asked:
Could you tell me what you use in your hair and what you tell your hair stylist when they cut your hair? My hair is about the same curliness and length and I love the way yours is cut and styled!
Mary actually asked this question several years ago. Can you believe it!?
My hair wasn’t in bad shape then — even though I wasn’t doing everything I’m doing today. It just goes to show that if you don’t have issues (like dry climate, hormonal imbalances, and aging) going on, your hair has more resilience.
However, in the past couple of years, I found myself with a tangled, dry, unhealthy, frizzy mess. Due to climate and hormone changes and age catching up with me, I’m guessing.
In desperation, I started looking for more answers, and here’s what I found…
Know Your Hair’s Porosity And Curl Type
Although there is an overall right method to care for curly hair — which involves knowing it has a tendency to dryness and frizz and using products that help you retain moisture as much as possible — even within curly hair you’ll find different types.
If you have curly hair, you must identify four things about your hair upfront — strand thickness, hair density, porosity, and curl type.
Strand thickness refers to how thick each individual strand of hair is. Compare your hair strand to half of a piece of thread. Most sewing thread is 2-ply, meaning it’s two threads wrapped up into one… so separate the piece of thread into its two thinner strands, and voila! One of those is comparable to a normal hair strand’s thickness. Fine hair is thinner than that half thread, and coarse is thicker.
Hair density refers to how many hairs are on your head. When your hair is parted, can you easily see your scalp (low density), somewhat see your scalp (medium density), or barely see your scalp (high density)?
Porosity refers to how porous your individual hairs are. They are either low (closed cuticles or low absorbency), medium, or high (open cuticles or highly absorbent). You can tell your porosity by how quickly your hair gets fully wet when you hop in the shower — quickly (as in seconds) is high porosity, within a minute is medium porosity, and within several minutes (including some massaging to help it along) is low porosity. The photo above illustrates this.
Finally, curl type. Curl type refers to how curly your hair is, from wavy to curly to kinky, and variations in between. This is probably least important when choosing to use curl cream or gel or both, but is still something to consider when you evaluate your results to see if these products helped or hindered your curls from really shining. See below where I address this in depth.
I talked more about porosity in my post: What To Do For Thinning Hair +Great Hair EVERY Day. If you haven’t already, please go there and read it so you can identify your porosity. I’ll share more about curl type down below.
Why You Should Know Your Porosity & Curl Type
Knowing these four things will make the WORLD of difference when choosing products and tweaking the general routine to work best for you.
You’ll have less chance of wasting money on products that don’t work. (Notice I said less chance; it’s not a guarantee but it will shorten the trial period considerably.)
. Well, no more, because I have finally learned THE best way to care for curly hair. Here's how to style curly hair naturally, tips for the best products, my daily hair care routine plus my before and after photos, and more... whether you have short, long, or wavy hair! It even works for kids. Time to embrace your natural hair!")
Porosity refers to how porous your individual hairs are. They are either low (closed cuticles or low absorbency), medium, or high (open cuticles or highly absorbent). The photo above illustrates this.
Read more about porosity (and identify your porosity type) right here. IMPORTANT!
You might be able to identify if your hair tends toward low or high porosity with this quick list of “symptoms”:
- low porosity — shiny hair; takes a long time to dry; easily susceptible to product build-up
- high porosity — dries quickly; extra prone to frizz and dryness
(Medium is in the middle of these extremes.)
Examples Of Getting Hair Type Wrong…
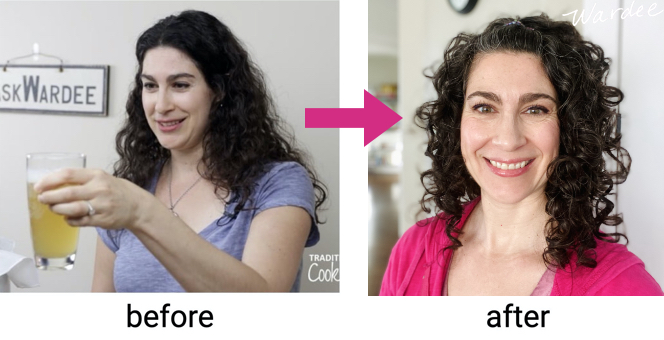
My hair type is: fine strands, medium-low density, and high porosity.
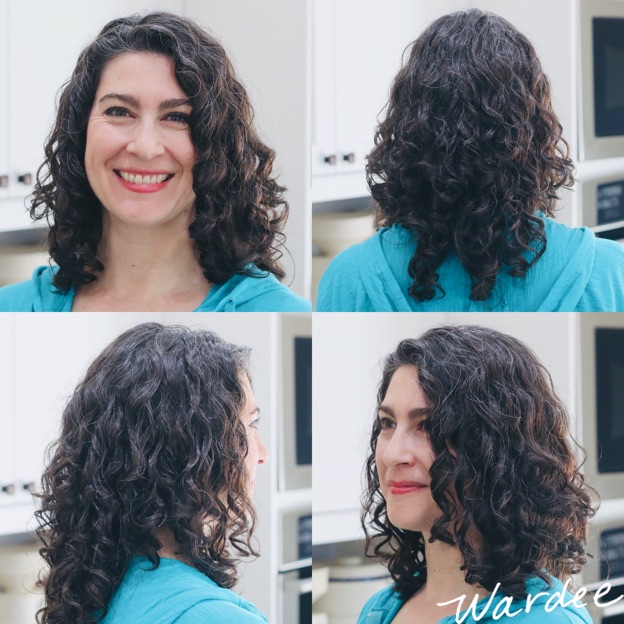
When I was using the wrong products for my hair type, it looked like in this “before” photo. When I got the products right for my hair type, it started looking great overnight!
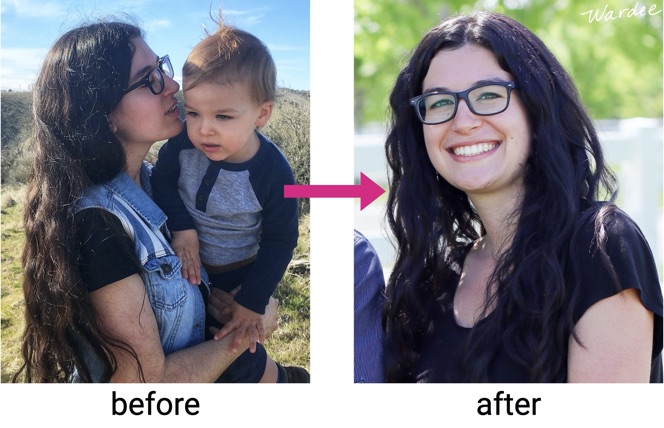
Next, here’s my daughter Haniya. Her waves turned glossy, defined, and full when switching to products aimed at her hair type… normal strand thickness, medium density, and low porosity.
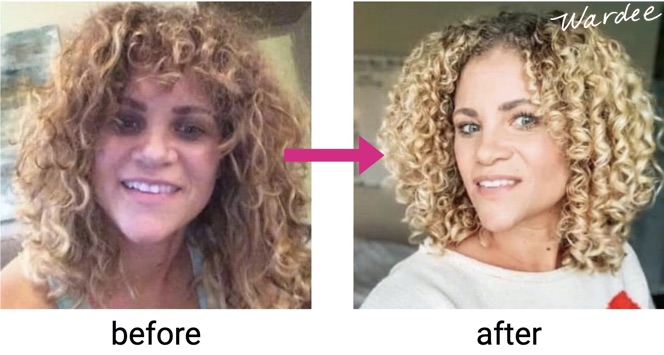
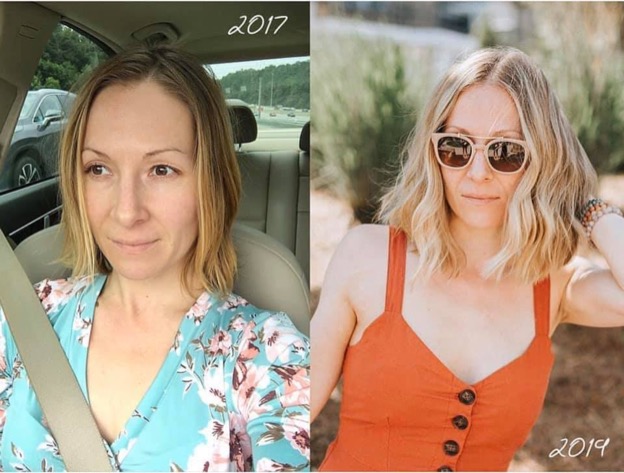
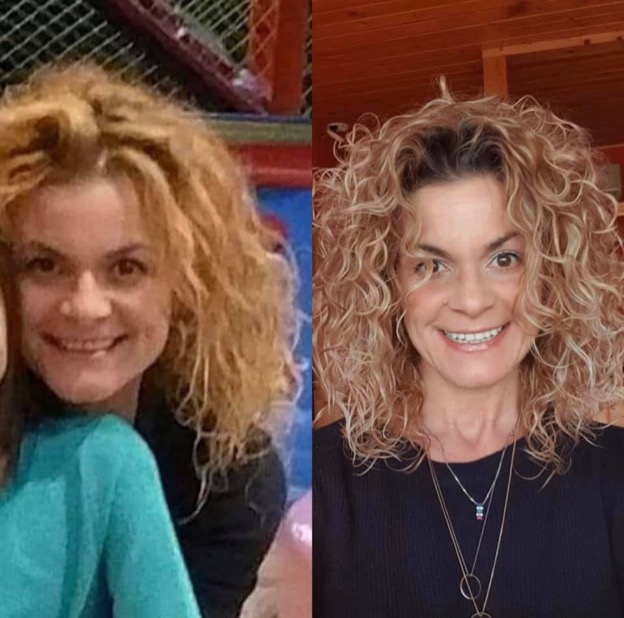
And this is an example of someone that I do not know, but look at the transformation when using the right products for her hair type!
What’s Your Curl Type?
One day I was browsing hair products for “curlies” and reading the comments, I noticed people asking questions like: “My daughter has 4b curls. Will this work for her?”
Or reviewers writing things like: “This product works great on my 3c curls!”
First, porosity? Now, 4b and 3c curls??? What is going on? What planet am I on? I thought.
So I did an internet search for curl type… and found out that I had indeed entered a new world for naturally curly hair.
You see, on Curl Planet, you have categories of curls called 2, 3, and 4; 2 is wavy, 3 is curly, and 4 is kinky.
And within those, you have degrees of curl, from lighter to stronger— 2a, 2b, 2c; 3a, 3b, 3c; and 4a, 4b, 4c.
My hair is a combination of 3a and 3b curls. My daughter Haniya has a combination of 2b/c waves and 3a curls. Finally, my younger daughter Naomi has 2a waves.
(You can see more pictures and descriptions of curl types here.)
Another Way To Identify Your Curl Type…
In the book “The Curly Girl Handbook” (which I’ll talk about in a bit), the author Lorraine Massey suggests other names for curl types such as fractal, zigzag, corkscrew, corkicelli, cherub, botticelli, wavy, and s’wavy. They’re fun to explore, too. 🙂
My curls are a combination of botticelli and corkicelli.
Why Curl Type Is Important
When you know your curl type, you can make the most of your hair, so it looks it’s best. This includes how to style it and how to cut it. Let your curl type shine the way God designed it!
Now that you know your hair porosity and curl type, or curl pattern, we can move on…
How To Wash And Condition Curly Hair
. Well, no more, because I have finally learned THE best way to care for curly hair. Here's how to style curly hair naturally, tips for the best products, my daily hair care routine plus my before and after photos, and more... whether you have short, long, or wavy hair! It even works for kids. Time to embrace your natural hair!")
Much of the following method comes from what I learned in “The Curly Girl Handbook” (pictured above).
However, I have made tweaks that take hair type into account, concepts that are not mentioned in the book. Some of the tips don’t work for fine, low density, or low porosity hair in particular, since these types are sensitive to build-up and need more frequent washing and using fewer, lighter products.
However, it’s an amazing book!
The day I read this book, I washed my hair using the “method” that night. I didn’t do anything else, not even switch products, although I did skip the shampoo that night.
My hair was immediately different: not tangled, not too frizzy, softer.
The differences were so big, in fact, that I realized my hair was pretty healthy, I just hadn’t been treating it right. (I had thought it was damaged beyond repair… that’s how bad things seemed.)
I wish I’d known of the damage I was doing to my hair by not washing/conditioning properly!
Although you need to read “The Curly Girl Handbook” for yourself, here are a few principles from the book to get you going now.
Please note: You will find when you read the book “The Curly Girl Handbook” that there are slightly different ways of doing all the these steps to best enhance your curl type, plus there’s trial and error… also known as “figure out what works best for you”. And… be sure to use the right products for your porosity!
#1 — Throw Out Your Shampoo!
Regular shampoo is wayyyyy too drying, and causes tangles and tearing and frizz and pain.
Instead, use a detergent-free, sulfate-free, silicone-free non-toxic shampoo used as frequently as your hair type demands.
In addition, each time you wash, shampoo your hair two times, each time massaging well into scalp and letting sit for 1 to 2 minutes. This is especially important if using a shampoo such as mine that contains healing oils for the scalp as well as hair regrowth ingredients.
Because I have low porosity hair that is susceptible to build-up, I wash more often than someone with high porosity hair… see how this comes into play?
The right shampoo will NOT tangle your hair or strip the natural oils.
If you have high porosity hair and prefer to skip shampooing at times, massaging the conditioner into your scalp like described below will provide ample cleansing. Personally, I do not skip shampooing, because my low porosity hair needs to be cleansed from build-up frequently.
#2 — Always Condition Your Hair
Curly hair is drier hair and needs deep conditioning!
Carefully work a non-toxic botanical conditioner through your hair by massaging gently and using your fingers or a wide tooth comb to detangle and comb your hair. Leave it in for a few minutes or the duration of your shower while you wash the rest of your body and shave, etc.
If you have medium or high porosity hair, you can leave some or all of the conditioner in without rinsing it out. (Low porosity hair that’s sensitive to build-up should have conditioner rinsed out.)
You can also use a masque or deep conditioner in place of or mixed with your regular conditioner, and leave it on for the duration of the shower or even overnight. Doing this weekly or so is good for most hair, although just 5 to 10 minutes works best for low porosity hair. Here are my best tips for using a hair masque to deep condition.
If you’d like to find out if the hair products I recommend might help fix your frizzy, curly hair … click here to go to GreatHairToday.com!
#3 — Ditch The Bath Towel
Instead of a terry cloth bath towel, which is excessively drying and causes frizz, use a 100% cotton t-shirt or microfiber towel to scrunch dry your hair while your head is tipped upside down. Even better to do this in the shower after applying your styling products (which I’ll discuss more in a bit).
The first night I tried the Curly Girl method, I used a t-shirt. Then I ordered this towel, which is bigger and easier to wrap around my head after scrunching dry.
. Well, no more, because I have finally learned THE best way to care for curly hair. Here's how to style curly hair naturally, tips for the best products, my daily hair care routine plus my before and after photos, and more... whether you have short, long, or wavy hair! It even works for kids. Time to embrace your natural hair!")
Which Products To Use For Curly Hair
As you might know, I have high standards for which products I use on my body as well as which foods I eat. Toxic body products are a HUGE issue in hormone disruption, skin irritation, allergies, cancer, inflammation, chronic illness, and many other modern-day diseases.
My Criteria For Hair Products
In the past, I’ve sacrificed effectiveness by using “natural” products. I’ve also sacrificed my standards for more natural products in order to use high performing products.
Thankfully, I don’t need to make these trade-offs any more due to finding a line of products that not only is right for my hair type (and they have selections for all hair types), they are also non-toxic. Go to GreatHairToday.com if you’d like to know more about them.
Here are the criteria I follow when choosing my hair care products.
- non-toxic (free of silicones*, sulfates, parabens, phthalates, harmful fragrances or colors, etc.)
- high-performing
- appropriate for hair type and curl type (including styling products)
- address issues such as thinning, scalp health, dryness, flatness, frizz, curls, build-up, greasiness, etc.
*Silicones stick to the hair surface, creating a plastic-like film and prevent hair from absorbing water, air, and nutrients. Over time, this causes hair to become dry and brittle. It’s best to avoid these!
How To Pick The Right Products For Your Hair Type
I mentioned in the criteria above that the right products are suitable for your hair type.
This means, in addition to being non-toxic and high performing:
- Fine Strands, Low Density, Low Porosity — look for light protein or protein-free products that advertise “volume” or “for light, fine hair”
- Normal Strands, Normal Density, Normal Porosity — look for products for normal hair
- Coarse Strands, High Density, High Porosity — look for products containing protein and rich butters/oils and advertising “deeply nourishing”, “smoothing”, or “for coarse, thirsty, dry hair”
Most of us are a mix-n-match of types, in which case you will probably have a leading concern that trumps all others. For instance, since my hair is fine, I have to go with lightweight products even though I also need some moisturizing. So I look for lightweight volumizing products that are also a bit moisturizing.
I’ve found it’s not necessary to buy curl specific shampoo and conditioner, because your hair type trumps all and if you get that right, the rest falls into place.
The most important thing is to use the right products for your hair type, and usually, any other issues you might have tend to fall into place.
When You Use The Wrong Products
When I used products for coarse hair (too heavy for my fine hair), my hair got so weighed down and my curls turned into waves:

Then, when I got my “type” right… and used products promising “volume” with light hydration, I got the hair of my dreams — more volume, more shine, more bounce, and more curl as well as getting rid of the frizz and dryness.
And… in addition to being moisturized, shiny, soft, curly, and bouncy, my hair has volume from the very top of my head, where it can often be flat.
If you approach it this way, you might find that other issues present or need more time to address (such as thinning; go here for more info), then you address those areas of concern.
Natural Vs. Synthetic Ingredients In Hair Products
I want to bring this up because it comes up a lot. Should we look for products that contain 100% natural ingredients? My opinion is… not necessarily.
You see, just because an ingredient is natural does not mean it is safe. For instance, soy is “natural” but I don’t want to ingest it because of it’s hormone-disrupting dangers.
On the other hand, there are synthetic items and ingredients that are safe even though they aren’t natural. An example would be the Vitamix blending container. It’s a safe plastic (BPA-free, etc.).
Now, I wouldn’t eat synthetic ingredients, but I would consider using them on my body… if they are safe.
And this is why I choose “safe” products over 100% natural. Natural is a bonus, but more importantly… the ingredients must be safe and high performing!
The products I use and recommend are offered by companies committed to using natural ingredients whenever possible, but ultimately choosing safe (and avoiding unsafe) so that we all can experience good health with high performance!
How To Style Curly Hair (with Video)
In general, fine strands, low density, or low porosity hair needs to use just a TINY amount of lighter and fewer styling products because build-up is a real concern. Products just sit on top.
Normal to coarse strands or high porosity hair can and should use more products to define and moisturize curls and more!
(Remember that you have a concern that trumps the others… so even if your hair is high porosity, if it’s fine, you can’t use heavy products no matter what.)
With my fine hair, I keep the products very simple. I use a small amount of gel (and sometimes curl cream), and I add a styling taffy at the ends for texture. That’s it. Anything else is too heavy, weighs my hair down, and doesn’t feel good.
Although I had forgone styling products for years because they weighed down my hair, I’ve finally found ones that WORK and make my hair look better. So I’m happy!
Step-by-Step Styling Video (Wash or Non-Wash Day)
Since I’ve been using my current hair care products, my hair has gotten healthier to the point where I can skip two or three wash days and it looks just as good as wash day. (I used to have to wash it every day for it to look good.)
Here’s how I style my hair, on wash day or non-wash day. I find I’m diffusing every day now. It’s not only easy, my hair has so much volume, curl, and less frizz if I do. It’s hard to argue with “it looks better”. 🙂
The steps below are for non-wash day, but it’s essentially the same as wash day with a shampooing and conditioning thrown in there at the beginning. 🙂
1. Get the water warming up, either in the shower, bathtub, or even a deep kitchen sink with removable spray nozzle. (Or if it’s a wash day, shampoo and condition in the shower and leave your hair dripping wet for the styling steps.)
2. Lay out microfiber or t-shirt towel on the rim of the bathtub.
3. Get gel and wide-tooth comb nearby, too.
4. Wet hair down fully, until saturated and dripping wet. Put your hands through the hair where the water is running to help it get in there fully.
5. With head upside down, gently comb through until tangle-free. (Collect the hair in the comb and from the ends of your hair and save it to throw away.)
6. *Squeeze a dime size amount of gel into the palm of your hand, then rub between palms.
7. Head still upside down, “scrunch in” gel from the ends to the scalp, really squeezing to ensure the gel really gets in there. Also run your hands through your hair at the back/base and crown in case your squeezing doesn’t reach that hair as much. This is important for getting clumpy, not frizzy, curls.
*If you’re going to air-dry your hair and your hair already has some gel in it from a previous day, use none or just a little additional gel when scrunching.
8. Head still upside down, scrunch from ends to scalp with microfiber or t-shirt towel, much the same way as you applied gel, to remove excess product and water.
9. Flip head right side up … to find clumpy curls with volume already, even at the crown. Arrange it a bit, lightly, so that your hair is parted like you prefer.
10. Apply styling taffy to ends and crown, also “scrunching in”, for a bit more texture, shine, and curl definition. (optional)
11. Either stop here and air-dry or now diffuse with head upside down until 80% dry. The hair dryer with diffuser attachment goes on “warm” heat level, and “low” speed. Flip head upside down because this will ensure lots of volume at the crown.
With minimal touching, and no scrunching, gather up sections of hair and fold them up in the diffuser, bringing the diffuser close to the scalp and holding for 10 to 15 seconds for each section. Repeat, drying different all over the head until hair is 80% dry (to minimize frizz), especially at the crown.
UPDATE Jan 2023: Here’s a neck-safe diffusing routine so you can achieve voluminous curls without flipping your head upside down!
12. Flip your hair right side up to finish drying the sides, back, or even the crown a bit more …but don’t go more than 80% or so to minimize frizz.
13. Gently and with minimal touching, arrange your part so the hairs are mostly going the right way. It is probably pretty full and crazy right now… but don’t worry, it should calm down. Usually I put my makeup on now and by the time I’m done with that (another 5 minutes) my hair is calmed down to a curl level I love.
14. If you use hair spray, spray it on now. I used to avoid hair spray because I didn’t like how it felt, but I’ve got a hair spray I love now (doesn’t gunk it up) that helps hold the curl and fullness all day!
Again, using the right products for YOU makes all the difference in styling. If you’d like to see if the products I use might work for you, too (they are high-performing and non-toxic), go through my quiz at GreatHairToday.com!
And now here are some principles to guide you in finding the right combination of steps for styling your own curly hair…
Curly Hair Styling Rules:
#1 — No Combs Or Brushes On Wet Hair… Or Heat Tools!
When used on dry hair, regular combs and brushes not only introduce frizz, but they also damage hair and make it break more easily. If you’re using the right products, your hair should not be tangled. Although, if you like, you can use a wide-toothed comb or curly hair specific brushes (I love these) to spread out product, detangle, or brush style when your hair is wet.
Also, don’t use heat tools such as blow dryers (except on low or medium with a diffuser; see below), straighteners, curling irons, etc. These cause so much damage!
Plus, they are just not necessary — let your natural waves or curl go free, don’t blow dry!
I was (and still am) shocked at how changing to the right products and using the right method of washing/conditioning my hair means I no longer need to comb at all. This is what I doubted the most because tangles were a daily headache before!
#2 — Apply Styling Products While Hair Is Wet
Remember, if you have fine or low porosity hair, use less product to avoid build-up or flattening.
Apply your styling products (appropriate for your hair type), such as leave-in conditioners, styling milks/creams, gels, and/or mousse, while hair is still wet. Add the products while hair is sopping wet to damp (depending on what works best for you), then scrunch-dry the excess water off with a t-shirt or microfiber towel.
I learned from my stylist to do all of this in the shower! She also said to use the products in the order listed above (whichever ones you use), from richest to lightest.
It’s pretty cool to come out of the shower with your hair “done” — if you’re air-drying it, that is. 🙂
#3 — Don’t Touch Your Hair Until It’s Dry
Once you’re done adding products and scrunching dry with microfiber or t-shirt towel to remove the excess, don’t touch your hair until it’s dry. This keeps down the frizz.
If you use a diffuser to speed up the drying, see below for how to do it to minimize frizz.
#4 — Break The Cast
After your hair is dry, tip it upside down and gently shake out the curls with your fingers. This will break any gel cast and leave the curls soft and defined and fluffy. It really does work! If using, you could set the curls with a hair spray at this point.
I share more detailed instructions for breaking the gel cast in this post!
#5 — Apply Oils As Needed
Hair oils are wonderful for dry ends, or even smoothing frizz that builds up during the day.
Be sure to use light oils if you have fine or low porosity hair, and heavier hair oil or butter for high porosity, coarse hair.
Always use sparingly. You can always add more if needed.
#6 — Plopping
If you wash your hair at night, consider “plopping” it to preserve the curls for the morning. This is where you wrap your hair up, in a long-sleeved t-shirt or microfiber towel in a specific way that protects curls, instead of crushing them, while you sleep.
Then, in the morning, you refresh the curls with water (all hair types) and/or or leave-in conditioner or other heavier products (drier hair).
People also plop their hair for 5 to 15 minutes when they get out of the shower in the morning, to absorb some of the water and help their hair dry faster. This doesn’t work for me because my hair dries too much and loses too much curl. I prefer to “microplop” as I describe below in the towel section.
You’ll find different plopping methods with varying degrees of complexity. I’ve tried a few just out of curiosity. (I normally wash my hair in the morning, so plopping isn’t necessary.) I would suggest going to YouTube and looking through some plopping videos to find a few methods to try out!
It’s my opinion that plopping is better suited for normal to coarse hair, because fine hair is best refreshed with a full wash/condition!
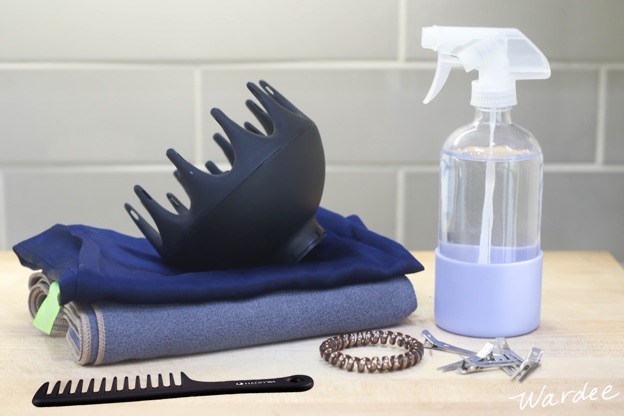
The Best Tools & Equipment To Care For Curly Hair
Oh, yes, there are more things to look into for your curly hair journey!
#1 — Microfiber or T-Shirt Towel
Mentioned above, a microfiber towel is far superior to a terry cloth towel for drying your hair. Terry cloth introduces frizz and strips too much moisture from curly hair.
I have this t-shirt towel (suitable for long hair). Scrunch dry your hair, with head upside, after applying styling products (to remove excess). This is called “microplopping” and works better for my fine hair than full plopping.
You can also use a 100% cotton t-shirt! Just no terry cloth!
#2 — Silk Pillowcase
Did you know that what kind of pillowcase you sleep on matters? Yes!
Because normal pillowcases, like cotton and cotton blends, cause itching, frizz, and tearing. On the other hand, silk is not only natural, it’s smooth, cool, and doesn’t irritate or encourage frizz.
I purchased this silk pillowcase right after learning this and the difference is astounding. Not only does my hair not itch me at night anymore, I don’t wake up a frizz ball.
Get 15% OFF on a pure silk pillowcase right here when you use the code WARDEE at checkout!
It’s quite amazing.
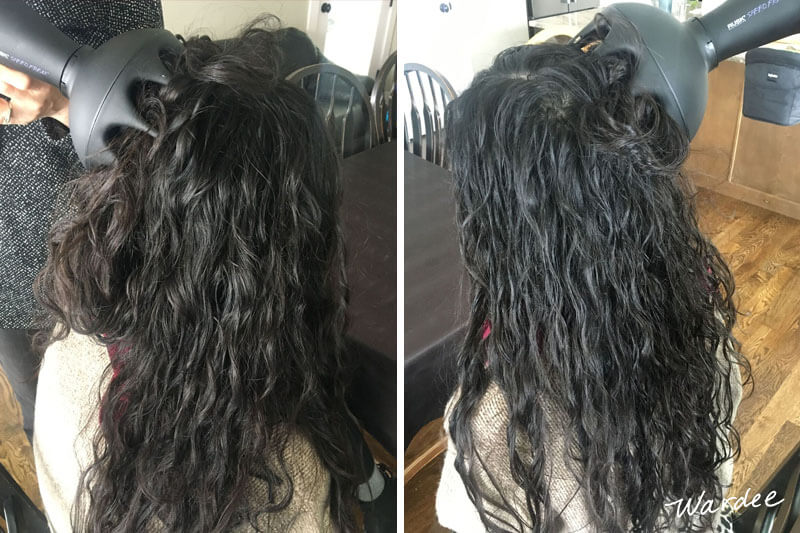
Diffusing Haniya’s hair so it would be completely dry for the photos we took for this post! These pictures show how to gather up the hair in the diffuser as I explain below.
#3 — Diffuser Hair Dryer Attachment
I used to use a diffuser in high school and college and gave it up because of the time involved. Now, I diffuse my hair 5 to 7 days a week because I get so much more volume and curl.
I have this diffuser that goes on the end of my hair dryer.
Here is a photo from a morning when I did diffuse my hair…
I learned from our stylist, Haley, how to do it. (Scroll up to the step-by-step video above for a visual demonstration.)
You use low or medium heat, plus low or medium airflow.
You gently enclose a section of your hair in the diffuser and roll it up in the diffuser, bringing it all up close to the scalp (see photo, above). Just hold it there for a good 10 to 15 seconds before doing another section.
The best way to care for curly hair with a diffuser is to keep touch to a minimum. There’s no need for scrunching while drying because that just introduces frizz.
Haley also said to diffuse only until your hair is 80% dry (to keep the frizz down).
I usually watch a video on my iPad or listen to an audiobook while I’m diffusing my hair. It’s restful and when I trouble myself to do it, I like the results.
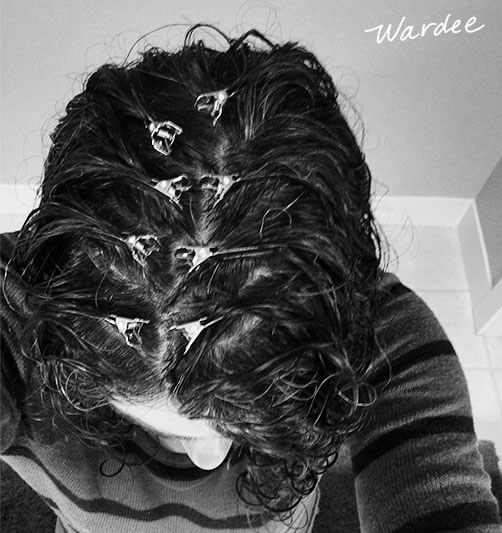
#4 — Double Prong Hair Clips
You put these double prong hair clips in small sections of hair along both sides of the crown of your hair to lift your roots and add body there (instead of the top of your hair being flat). It’s called “clipping roots”.
This is so new to me that I’m not sure how to describe how to do it, but I can say I really like the effect. I use about 6 to 8 total in my damp hair along both sides of the crown and leave in for about half of the time I’m diffusing. (See photo above for placement.)
At the beginning of diffusing, I just hold the diffuser about the top for a few minutes to simulate being in a hooded dryer. Then I diffuse the rest of my hair, stopping at about halfway dry to remove the clips and then dry the rest.
Tip: You can achieve body on top of your head without clips by diffusing with your hair upside down for at least the first bit!

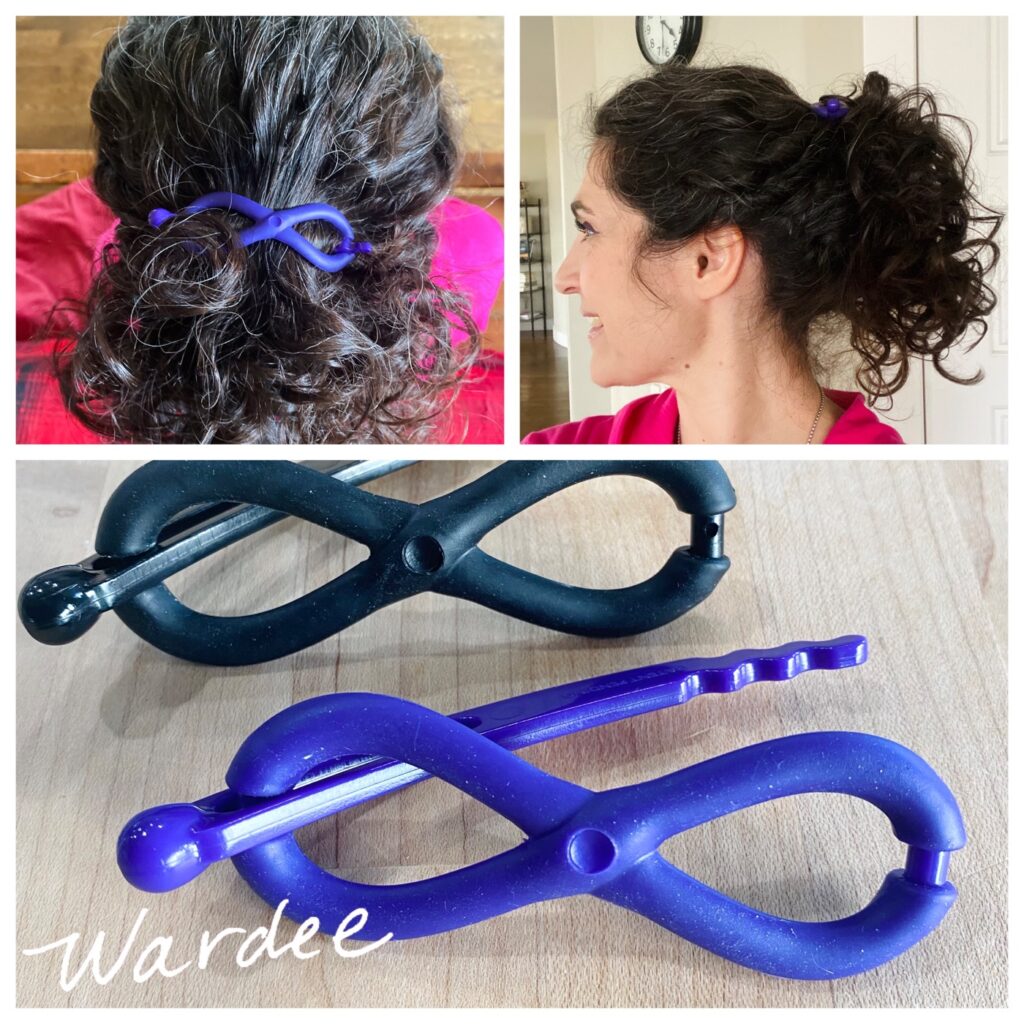
#5 — Telephone Wire Hair Ties or Other Non-Damaging Hair Clips
It’s really important to avoid damaging your hair with harsh, tearing bands, clips, or ponytail holders.
My favorite non-damaging clips are from Lilla Rose (pictured above). I always buy the plain-er ones but they have fancy, too. And many sizes… for just a bit of your hair to a full ponytail or updo, for thin fine hair to super thick.
My hair is on the fine/thin side, always has been. Pictured is an XXS clip (holding a tiny bit back). If I’m putting more of my hair back, I use XS for half back, or S for a ponytail/bun.
And here is me wearing the Lilla Rose Flexi Sport (right here), which I love best of all because it’s more casual, waterproof, and grippy:
Visit the Lilla Rose website for style and sizing ideas. Or reach out to me if you need any help (help at wardee dot com).
Another suggestion… these telephone wire hair ties or these silk scrunchies! No damage, no tearing, doesn’t leave creases in your hair, and easy to get on and off. If you put your hair up in a pineapple at night, they work perfectly.
(If you order the silk scrunchies, use code WARDEE to get 15% OFF!)
What’s a pineapple? It’s when you do a pony tail on top of your head at night. Although women wear them at other times of day, at night, this protects your curls from being crushed or frizzed up during sleeping. 🙂
#6 — Spray Bottle
On no-wash days, refresh and reset curls with water and lavender in a spray bottle (fine hair) or apply styling products/butters (coarse/dry hair). Another option if you have normal to high porosity hair is to put a bit of leave-in conditioner in the spray bottle, too.
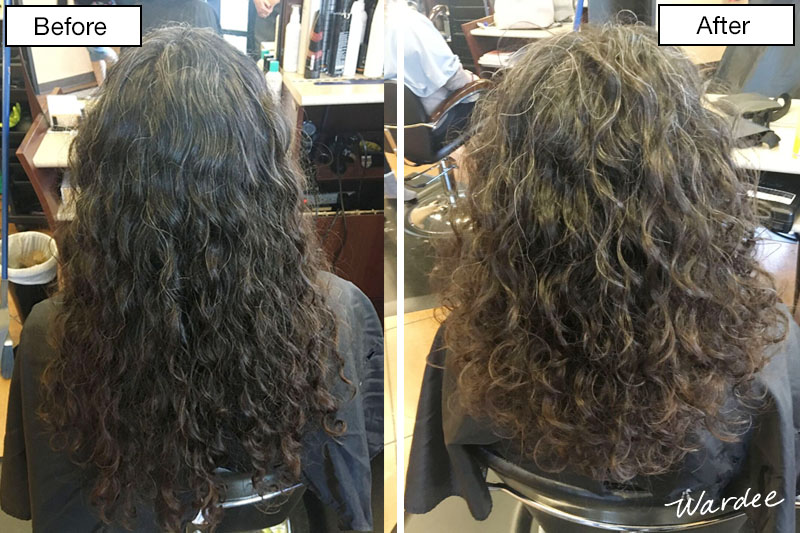
My “before” and “after” photos from the day I got my first DevaCut!
Best Hair Cut For Curly Hair: DevaCut
You knew I was going to go there, right? If we’ve talked about everything else and the right way to do it, there’s got to be a RIGHT way to cut curly hair.
And there is!
I confess this was a revelation to me as well. I heard about it from Vicki B., who told me via email about the thing called a “DevaCut”.
DevaCut??? A haircut just for curlies???
Yes! These stylists are trained in the BEST way to cut (and style) curly hair.
They cut your hair when it’s dry and they cut it to best enhance your curls, whether a long or short hair cut. Generally, though, layers is the answer.
(Layers is another thing I have instinctively known since I was a teenager. With the exception of one time I got my hair cut as short as a boy’s, I have always known that “long layers” was best for my hair.)
I will warn you, though… I called two certified stylists who told me they were full and couldn’t take on any more clients.
There is a big shortage apparently! (Business opportunity!!!)
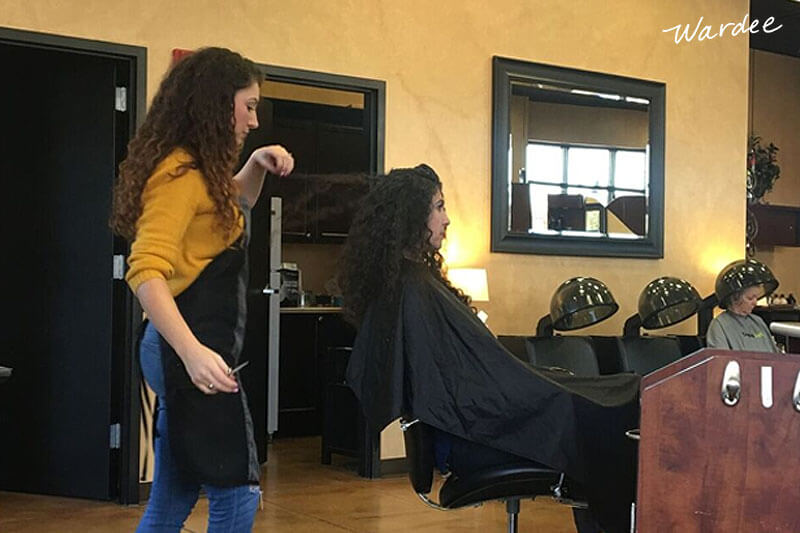
Yet one of them recommended her friend Haley from Nancy Jane Salon in Meridian, Idaho. (She’s pictured above.)
Both Haniya and I got our first cuts from Haley and we are really happy and continue to go back to her!
Even better, at our appointments, which were our first of the kind, Haley gave us the whole DevaCut education — how to wash, condition, add products, and style hair. We learned so much and had so much fun!
What Happens During A DevaCut?
Here’s what to expect during your first DevaCut!
- talk about what you want
- do the basic cut with your hair dry
- wash, condition, apply products (while learning how to do it yourself)
- “clip your roots” (see above in tools)
- sit under the dryer for 5 minutes to dry roots a bit
- remove clips
- diffuse hair
- cut a bit more to feature your curls
- leave oh-so-happy with bouncy, natural curls!
It takes about an hour and it’s so fun!
If you’re interested, DevaCurl has a directory of DevaCut trained stylists/salons right here.
How Caring For My Curly Hair Surprised Me!
I thought I would end with a quick section on my biggest surprises through this journey… things I never expected to happen as a result of getting my haircare right.
#1 — My grey doesn’t stand out as much anymore.
When my hair was looking really bad, dry, flat, and frizzy, those wiry grey hairs stuck out all over the place. You could see them a mile away.
When my hair is soft, shiny, curly, and moisturized, the grey hairs blend in a lot better. That is a surprise I didn’t expect at all!
#2 — I thought my hair was in really bad shape.
I thought it was unhealthy and might take months to restore. Yet when I started treating it right, it literally only took one washing/conditioning to turn it around almost completely.
So it really wasn’t as bad as I thought!
#3 — My hair doesn’t itch me anymore.
Who would have thought!? It doesn’t itch on the pillow, it doesn’t itch my neck, it just plain doesn’t itch. Wow, a total surprise.
#4 — I’m not dribbling hair all over the place anymore!
I still lose my 100 strands a day (which is average) but because my hair is staying curly, mostly they aren’t falling out. They’re getting hung up in the curls. So I collect them in the shower instead.
The floors are staying cleaner. Again, who would have thought???
#5 — Gel doesn’t make Haniya’s hair feel greasy.
My daughter Haniya has two surprises to share, too. She used to hate using gel or anything because it made her hair feel greasy.
Yet when switching to these methods, she is now LOVING gel and her hair doesn’t feel greasy, it feels soft!
She says she had to change her perspective so that “clean hair” feels saturated and velvety in the shower instead of stripped and squeaky. It’s a nice change and she’s thankful!
#6 — It’s actually easy!
Haniya was also surprised by how easy it all is. It was a little daunting at first to incorporate all these new steps but in the end, it made things easier. No more brushing, for one thing!
She has simplified her routine. All it takes is every other day: a quick shampoo, conditioner, scrunching her curls, and gel.
For the sake of time, she doesn’t often diffuse or clip and her hair still turns out fantastic! So for any busy moms out there, it’s possible for you, too!
Is It Really Possible To Say Goodbye To Frizzy Hair?
When I hit my 40s, I started to feel UNsexy, with awful hair… nearly every day was a bad hair day! It was dry, frizzy, tangly, and flat, and lost the shine and bounce I’d had when I was younger.
I was frustrated because I wanted to use non-toxic products (to avoid the headaches and rashes I got from most products before), but none of the “natural” things I was trying (both purchased and homemade) seemed to work.
Then I decided to try some hair care products I learned about on the internet.
Within a month of trying the hair products, my hair looked curlier, shinier, NOT frizzy, and was perfectly moisturized without being weighed down. EVERY day became a great hair day!
Since then… people keep asking me where I get my hair done, not realizing it’s the products I use, too!
If you or anyone you know might want to know about the products, go to GreatHairToday.com!
More Examples Of Curly Hair Transformations!
Thank you to the following ladies who bravely shared their before/after photos to give us all hope that with using the right products for our hair type, we also can have great curly hair every day!


Helpful Links On The Best Way To Care For Curly Hair
- What To Do For Thinning Hair +Great Hair EVERY Day
- Wikipedia article on porosity
- Pictures and descriptions of curl types
- “The Curly Girl Handbook” book
- “Silver Hair Handbook” by Lorraine Massey
- Microfiber or t-shirt towel
- DevaCut trained stylists/salons directory
- 100% silk pillowcase — use code WARDEE to get 15% OFF at checkout!
- Hairdryer
- Diffuser attachment
- Double prong hair clips
- Lilla Rose non-damaging hair clips (or the Flexi Sport here)
- Telephone wire hair ties
- 100% silk hair scrunchies — use code WARDEE to get 15% OFF at checkout!
- Wide-tooth detangling comb
- Curly Hair Brushes (my favorite is the large curl clumps brush, they also have a small curl clumps brush)
- GreatHairToday.com — to see if what I’m using might help you, too
What is the best way you care for your curly hair? If you have curly hair, please share your tips in the comments! And if you learn any surprising benefits from improving your curly hair care, share those, too!
Find out if the hair products I recommend might help fix your frizzy, dry, curly hair, too...
Click the button below to take a quick questionnaire and we'll take it from there!
I am super happy you shared this, & it has put my on a hair journey that I can see is going to improve my life. One thing I have learned is that fine & coarse hair do not equate to low & high porosity. I have very fine hair (individual strands thin) that is high porosity ~ the cuticles are open, so my hair absorbs water easily, but it does not hold the moisture, so it ends up very dry, frizzy, & prone to breakage. Likewise, it is possible to have coarse hair (individual strands thick) that has low porosity ~ the strands have closed cuticles that do not easily absorb moisture. Thanks for all the knowledge you share!
And I wanted to add that my hair is not highly porous from any kind of styling. I don’t curl, straighten, dye, blow dry, or give any other kind of stressful or damaging treatment to it, so that is not the cause. It’s always been this way in my memory. After washing it with baking soda for 3 years tho’, the breakage became very significant. I have been healing it for a few years, & the split ends have almost disappeared, but the frizz is still a chronic issue. But I have some hope after seeing your video!